LightSwitch timeouts and SessionState service

In terms of IIS, a LS app is just another web app, so all the same rules apply such as Forms Session cookies.  I had taken care to set session timeouts, but still was having timeouts at random times which left me confused; until I realized application pool restarts wipe out the session state on the server.  So you need a way to persist session state across AppPool restarts (and server restarts).  If you are using 3rd party Hoster, your app pool is normally shared across all sites on the server. So you should assume your app pool is restarting all the time for various reasons (configuration changes, memory pressure, maintence, etc)  The easiest way to store session state is the use the ASP.NET State Service.  Here is the process:

1) Start the ASP.NET State Service and change to automatic startup. Your hoster may already have it started.  Arvixe does for example.

2) Update your LS web.config in the ServerGenerated folder. Add or change the authentiation element and sessionState element using below as a guide.

3) Deploy your app again and browse to your application or  Hit F5 if already open to pull down new version and update session.
<system.web>

    <authentication mode=”Forms”>
      <forms name=”MyAppName” timeout=”1440″ />
    </authentication>
    <sessionState mode=”StateServer” cookieless=”false” timeout=”1440″ />

<system.web>

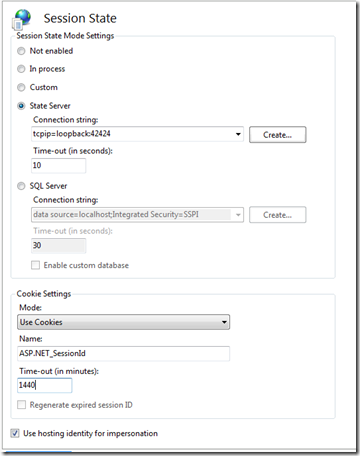
You can also view or change your application’s session state in IIS MMC in the Session State icon. It is best to add to your LS web.config as it will persist across deployments.

image

Hope that helps.
–William

Posted in C#, LightSwitch | Tagged , , | Comments Off on LightSwitch timeouts and SessionState service

LightSwitch and Slot number order for Auditions Sample

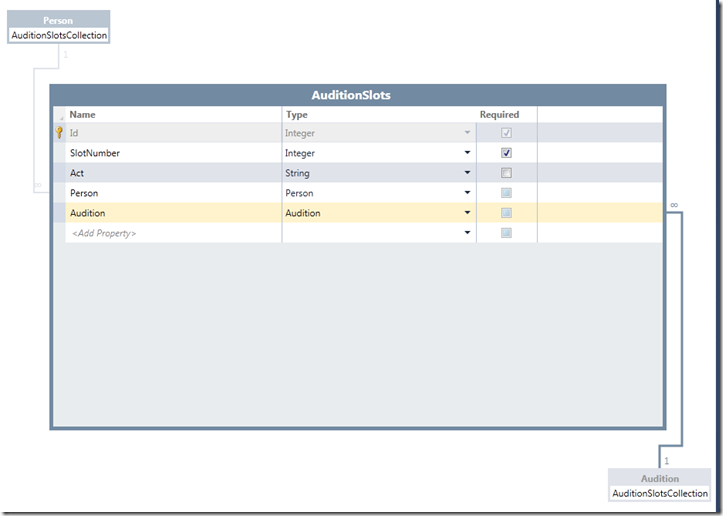
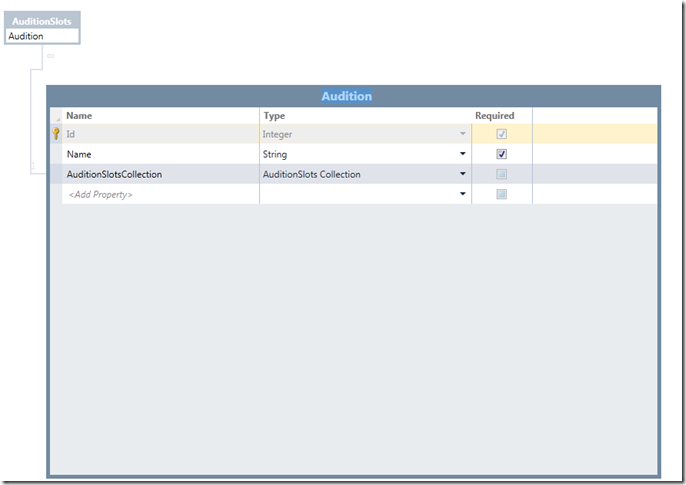
Create a junction table to map Auditions to People. The AuditionSlots table will include the SlotNumber (make Unique) and the Person and Audition (make Unique). This way, slot numbers are unique per audition. Change the slot numbers to reorder acts and save.

image

AuditionSlots table

image

Auditions Table

image

Posted in C#, LightSwitch | Tagged | Comments Off on LightSwitch and Slot number order for Auditions Sample

Febco 765 Sprinkler Backflow Repair

Ok, first none technical post in a long time.  It is rare when you find something that is cheaper, better, and designed better then the original repair part.  This gave me some joy, so I felt it deserved a post for someone else.  If you have a Febco 765 Backflow on your house for your sprinkler system (as many do), don’t buy the Febco replacement Bonnet and Poppet kit as it is junk (the rest of the unit is good).  This Blue Heron replacement is 5 times better.  Better plastic and better design. DIY for about $30 bucks from SpinklerWarehouse.  A plumber or sprinkler guy will charge you $100-$200 for the repair and will probably not use this fine part.  Even if you don’t need one yet, I would buy this, replace current and keep old one as emergency spare.

FebcoPoppet

http://www.sprinklerwarehouse.com/Blue-Heron-Replacement-Kit-Febco-p/abr091011.htm

Posted in Uncategorized | Comments Off on Febco 765 Sprinkler Backflow Repair

Switch your lights with LightSwitch

LightOn

With a name like LightSwitch, you know someone had to do it eventually. Smile

Here is fun little project that combines Microsoft LightSwitch and a Microsoft Micro Framework controller to switch LEDs on and off.  Here is the hardware:

LSFritzing

  • FEZ Panda
  • Breadboard small
  • 2 LEDs, one red, one green
  • Jumper wire
  • 1 or 2 100 ohm resistors. Sharing a resistor here.
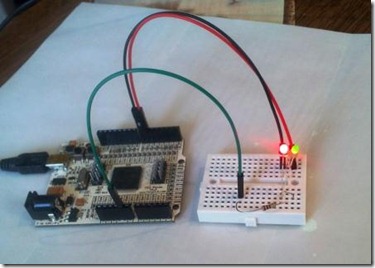
2011-06-13 14.08.17

And here is the LS screen to both control lights and see current light status:
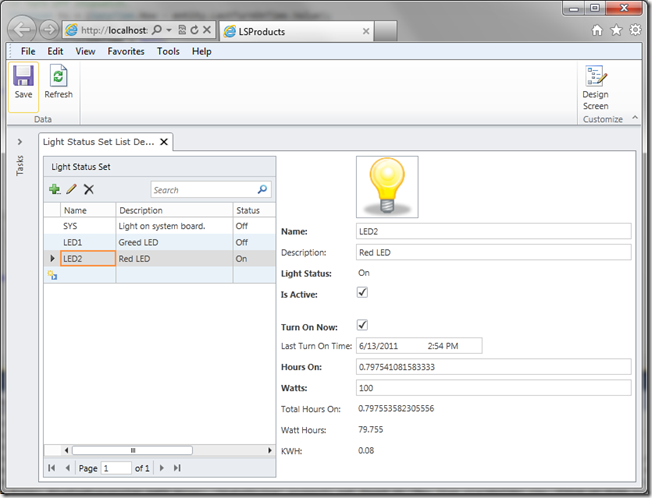
LSLightScreen2

Below is the LS table that drives everything:

LSTable

Basically, it works as follows:

  • I hook into the tables Updating event.
  • Inside the event, I send a single line command to the NETMF device via SerialPort.
  • The NETMF device is listening on USB serial device in a loop reading lines and performs the on/off switching based on what light name is send in the command line.
  • Before leaving Updating event, I update the light status to on or off to reflect its new state.
  • After the Save, the screen reflects the new state information that was set inside the Updating event.
partial void LightStatusSet_Updating(LightStatus entity)
{
    SendLightCommand(entity);

    if (!entity.LastTurnOnTime.HasValue && entity.TurnOnNow)
    {
        // Turn on stopwatch.
        entity.LastTurnOnTime = DateTime.Now;
    }
    else if (entity.LastTurnOnTime.HasValue && ! entity.TurnOnNow)
    {
        // Turn off stopwatch.
        TimeSpan ts = (DateTime.Now - entity.LastTurnOnTime.Value);
        entity.HoursOn += ts.TotalHours;
        entity.LastTurnOnTime = null;
    }
}
private static void SendLightCommand(LightStatus entity)
{
    if (!entity.IsActive) return;
    if (port == null)
    {
        port = new SerialPort("com3");
        port.Open();
        Debug.WriteLine("Port opened. Send cmds.");
    }

    if (entity.TurnOnNow)
    {
        port.WriteLine(entity.Name + ",ON");
        entity.IsOn = true;
    }
    else
    {
        port.WriteLine(entity.Name + ",OFF");
        entity.IsOn = false;
    }
}

The device side is done same way. Just block reading lines from the SerialPort in a loop and handle the commands by name.  Here is the device code:

using System.Threading;
using Microsoft.SPOT;
using Microsoft.SPOT.Hardware;
using GHIElectronics.NETMF.FEZ;
using GHIElectronics.NETMF.USBClient;
using System.Text;

namespace FezPandaApp1
{
    public class Program
    {
        static OutputPort sysLed;
        static OutputPort led1;
        static OutputPort led2;

        public static void Main()
        {
            Debug.EnableGCMessages(false);
            sysLed = new OutputPort((Cpu.Pin)FEZ_Pin.Digital.LED, false);
            led1 = new OutputPort((Cpu.Pin)FEZ_Pin.Digital.Di6, false);
            led2 = new OutputPort((Cpu.Pin)FEZ_Pin.Digital.Di7, false);

            ReadComm();

            Debug.Print("Done.");
        }

        public static USBC_CDC StartCDC()
        {
            // Check debug interface. We don't do this check with CDC debugging port
            //if (Configuration.DebugInterface.GetCurrent() == Configuration.DebugInterface.Port.USB1)
            //    throw new InvalidOperationException("Current debug interface is USB. It must be changed to something else before proceeding. Refer to your platform user manual to change the debug interface.");

            // Start CDC
            Debug.Print("Hit Break all. Then Continue to Init CDC.");
            USBC_CDC cdc = USBClientController.StandardDevices.StartCDC_WithDebugging();

            // Send "Hello world!" to PC every second. (Append a new line too)
            byte[] bytes = System.Text.Encoding.UTF8.GetBytes("Hello world!\r\n");

            int count = 10;
            while (count-->0)
            {
                Debug.Print("Sending on comm.");
                // Check if connected to PC
                if (USBClientController.GetState() != USBClientController.State.Running)
                {
                    Debug.Print("Waiting to connect to PC...");
                }
                else
                {
                    cdc.Write(bytes, 0, bytes.Length);
                }
                Thread.Sleep(500);
            }
            return cdc;
        }

        public static void ReadComm()
        {
            USBC_CDC port = StartCDC();
            port.ReadTimeout = -1;
            while (true)
            {
                string line = CDCReadLineEx(port, 512);
                bool result = HandleCommand(line);
                if (!result) break; // Exit cmd.
                //CDCWriteLine(port, line); // Write reply if needed.
            }
        }
        
        public static bool HandleCommand(string line)
        {
            string[] cmds = line.Split(',');
            if (cmds.Length != 2) return true;
            string cmd = cmds[0].Trim().ToLower();
            string arg1 = cmds[1].Trim().ToLower();

            switch (cmd)
            {
                case "sys":
                    if (arg1 == "on")
                        sysLed.Write(true);
                    else
                        sysLed.Write(false);
                    break;
                case "led1":
                    if (arg1 == "on")
                        led1.Write(true);
                    else
                        led1.Write(false);
                    break;
                case "led2":
                    if (arg1 == "on")
                        led2.Write(true);
                    else
                        led2.Write(false);
                    break;
                case "exit":
                    return false;
                default: // Ignore
                    break;
            }
            return true;
        }

        public static int CDCWriteLine(USBC_CDC port, string line)
        {
            byte[] bytes = Encoding.UTF8.GetBytes(line+"\n");
            return port.Write(bytes, 0, bytes.Length);
        }

        public static string CDCReadLineEx(USBC_CDC sr, int bufLen)
        { 
            char[] readLineBuff = new char[bufLen];
            int curPos = 0;
            byte[] ba = new byte[1];
            while (true)
            {
                int read = sr.Read(ba, 0, 1);
                if (read <= 0) break;
                readLineBuff[curPos] = (char)ba[0];
                if (readLineBuff[curPos] == '\n')
                {
                    return new string(readLineBuff, 0, curPos);
                }
                curPos++;
            }

            if (curPos == 0) return null; // Null fix.
            return new string(readLineBuff, 0, curPos);
        }
    }
}

For this sample, we are just switching LEDs. But you could easily switch actual lights and other high power devices by adding Relays and/or MOSFETs to the setup.

Cool thing about using LightSwitch for this is it is already internet-ready and multi-user ready.  So deploy to the cloud and switch your lights over the internet.

So what if your LightSwitch server is hosted at a provider or not near your light sources?  Good news. You are covered there also. Instead of using a serial port, you can hook your NETMF device to Ethernet or wireless instead.  Do some port forwarding and/or open up your NAT at home and your LS server can send commands to your public facing NAT IP address which can forward to your FEZ.  You could also create a WCF RIA service on some box at home (or work) and talk to it from the LS server side.  You have many options with some imagination.  Just don’t open up your screen to the public if you don’t want your lights blinking on and off! Smile

Have fun and post blogs of your project !

–William Stacey

Posted in .Net Micro Framework, C#, LightSwitch | Tagged , , | 3 Comments

NETMF Get/Set Real Time Clock (RTC)

Just a short reminder post on how to get and set RTC.  The RTC is powered by VBatt pin and keeps the RTC ticking with the time after you set it once.  After you set it, then just read the time on boot and set the system clock.

private static DateTime SetDateTimeFromRTC()
{
    // RealTimeClock.SetTime(new DateTime(2011, 4, 22, 1, 1, 1, 0)); // Set once to set the RTC.
    DateTime dt = RealTimeClock.GetTime(); // Get RTC time.
    Utility.SetLocalTime(dt); // Set system clock.
    return dt;
}
Posted in .Net Micro Framework, C# | Tagged , , , | 1 Comment

FEZ firmware update helper

Just wanted a reminder post when I have to update FEZ with new firmware.

Update Fez Firmware
1) Hold LDR button then plug in USB.  New comm port should appear in devices (i.e. comm13)
2) Open TeraTerm
3) Erase current with E
4) Load new firmware with X from location (e.g. C:\Program Files (x86)\GHI Electronics\GHI NETMF v4.1 SDK\USBizi\Firmware)
5) Use XModem and 1K transfer.
6) Update your GHI references in your project(s) by removing them and adding them back. Create a screen snip of references before removing them to help remember which to add back.

Can also use MFDeploy to verify version before and after or just to check what level.

Posted in .Net Micro Framework, C#, FEZ | Tagged , | Comments Off on FEZ firmware update helper

NETMF Servo classes (PWM and Software versions)

Just posting some servo classes.  One for hardware PWM control and one for software PWM using OutputCompare. Never know when you may need.

using System;
using GHIElectronics.NETMF.FEZ;
using GHIElectronics.NETMF.Hardware;

namespace MicroFezRobot
{
    public class ServoHardPWM : IServo
    {
        readonly PWM pwm;
        readonly uint periodUs;     // Number of us in period.
        readonly uint periodNs;     // Number of ns in period.
        readonly uint lowDegree;    // Low degree of servo; 0 default.
        readonly uint highDegree;   // High degree of servo; 180 default.
        uint lowUs = 690;           // microsecond (us) range. Find your specific values with servo range testing.
        uint highUs = 2422;         // microsecond (us) range.
        bool invert;                // Invert/reverse rotation.
        DateTime lastChanged;

        public ServoHardPWM(FEZ_Pin.PWM pin, uint periodUs=20000, uint lowUs=1000, uint highUs=2000, uint lowDegree=0, uint highDegree=180)
        {
            this.periodUs = periodUs;
            this.periodNs = this.periodUs * 1000;
            this.lowUs = lowUs;
            this.highUs = highUs;
            this.lowDegree = lowDegree;
            this.highDegree = highDegree;
            this.pwm = new PWM((PWM.Pin)pin);
            pwm.Set(false);
            this.lastChanged = DateTime.Now;
        }

        /// <summary>
        /// Gets or sets value to invert direction.
        /// </summary>
        public bool Invert
        {
            get { return invert; }
            set { this.invert = value; }
        }

        /// <summary>
        /// Gets number of microseconds (us) in the period.
        /// </summary>
        public uint Period
        {
            get { return periodUs / 1000; }
        }
        
        /// <summary>
        /// Gets or sets number of microseconds (us) in low servo range.
        /// </summary>
        public uint LowRange
        {
            get { return this.lowUs; }
            set { this.lowUs = value; }
        }

        /// <summary>
        /// Gets or sets number of microseconds (us) in high servo range.
        /// </summary>
        public uint HighRange
        {
            get { return this.highUs; }
            set { this.highUs = value; }
        }

        /// <summary>
        /// Gets datetime position was last changed.
        /// </summary>
        public DateTime LastChanged
        {
            get { return this.lastChanged; }
        }

        /// <summary>
        /// Sets current servo angle degree.
        /// </summary>
        /// <param name="degree">Degree to set. (i.e. 0-180)</param>
        public void SetDegree(uint degree)
        {
            if (degree < lowDegree || degree > highDegree)
                throw new ArgumentOutOfRangeException("angleDegree");

            uint posUs = ScaleRange(degree, lowDegree, highDegree, lowUs, highUs);
            SetPosition(posUs);
        }

        /// <summary>
        /// Sets current servo position.
        /// </summary>
        /// <param name="positionUs">High time in microseconds.</param>
        public void SetPosition(uint positionUs)
        {
            if (invert)
                positionUs = (highUs - positionUs) + lowUs;

            uint posNs = positionUs * 1000; // convert us to ns as SetPulse uses ns scale.
            pwm.SetPulse(periodNs, posNs);
            this.lastChanged = DateTime.Now;
        }

        /// <summary>
        /// Stops holding servo at current position by setting PWM low.
        /// </summary>
        public void Stop()
        {
            pwm.Set(false);
        }

        /// <summary>
        /// Dispose servo instance.
        /// </summary>
        public void Dispose()
        {
            // Try to stop servo clean on a pulse low.
            Stop();
            pwm.Dispose();
        }

        private static uint ScaleRange(uint oldValue, uint oldMin, uint oldMax, uint newMin, uint newMax)
        {
            return ((oldValue - oldMin) * (newMax - newMin) / (oldMax - oldMin)) + newMin;
        }
    }
}

using System;
using GHIElectronics.NETMF.FEZ;
using GHIElectronics.NETMF.Hardware;
using Microsoft.SPOT.Hardware;

namespace MicroFezRobot
{
    interface IServo : IDisposable
    {
        bool Invert { get; set; }
        uint Period { get; }
        uint LowRange { get; set; }
        uint HighRange { get; set; }
        DateTime LastChanged { get; }
        void SetDegree(uint angleDegree);
        void SetPosition(uint position);
        void Stop();
    }

    public class ServoSoftPWM : IServo
    {
        readonly OutputCompare oc;
        readonly uint periodUs;     // Normally 20,000us (i.e. 20ms)
        readonly uint lowDegree;    // Low degree of servo; 0 default.
        readonly uint highDegree;   // High degree of servo; 180 default.
        readonly uint[] timings;    // Used for setting OC timings.
        uint lowUs;                 // Small servo (e.g. 690)
        uint highUs;                // Small servo (e.g. 2422)
        bool invert;                // Invert servo direction control.
        DateTime lastChanged;

        public ServoSoftPWM(FEZ_Pin.Digital pin, uint periodUs=20000, uint lowUs=1000, uint highUs=2000, uint lowDegree=0, uint highDegree=180)
        {
            this.oc = new OutputCompare((Cpu.Pin)pin, true, 2);
            this.timings = new uint[2];
            this.periodUs = periodUs;
            this.lowUs = lowUs;
            this.highUs = highUs;
            this.lowDegree = lowDegree;
            this.highDegree = highDegree;
            this.lastChanged = DateTime.Now;
        }

        /// <summary>
        /// Gets or sets a value to invert the servo direction.
        /// </summary>
        public bool Invert
        {
            get { return this.invert; }
            set { this.invert = value; }
        }

        /// <summary>
        /// Gets the period in microseconds.
        /// </summary>
        public uint Period
        {
            get { return this.periodUs; }
        }

        /// <summary>
        /// Gets or sets the low servo range in microseconds.
        /// </summary>
        public uint LowRange
        {
            get { return this.lowUs; }
            set { this.lowUs = value; }
        }

        /// <summary>
        /// Gets or sets the high servo range in microseconds.
        /// </summary>
        public uint HighRange
        {
            get { return this.highUs; }
            set { this.highUs = value; }
        }

        /// <summary>
        /// Gets datetime of last position change.
        /// </summary>
        public DateTime LastChanged
        {
            get { return this.lastChanged; }
        }

        /// <summary>
        /// Sets the current servo angle in degrees.
        /// </summary>
        /// <param name="degree">Degree angle to set.</param>
        public void SetDegree(uint degree)
        {
            if (degree < lowDegree || degree > highDegree)
                throw new ArgumentOutOfRangeException("angleDegree");

            uint highTime = ScaleRange(degree, lowDegree, highDegree, lowUs, highUs);
            SetPosition(highTime);
        }

        /// <summary>
        /// Sets the current position of the servo.
        /// </summary>
        /// <param name="positionUs">Position in microseconds</param>
        public void SetPosition(uint positionUs)
        {
            if (positionUs < lowUs || positionUs > highUs)
                throw new ArgumentOutOfRangeException("positionUs");

            if (invert)
                positionUs = (highUs - positionUs) + lowUs;

            // OutputCompare uses microsecond (us) scale.
            timings[0] = positionUs;
            timings[1] = periodUs - positionUs;
            oc.Set(true, timings, 0, 2, true);
            this.lastChanged = DateTime.Now;
        }

        /// <summary>
        /// Stops holding servo at current position by setting PWM low.
        /// </summary>
        public void Stop()
        {
            oc.Set(false);
        }

        /// <summary>
        /// Dispose servo instance.
        /// </summary>
        public void Dispose()
        {
            Stop();
            oc.Dispose();
        }

        private static uint ScaleRange(uint value, uint oldMin, uint oldMax, uint newMin, uint newMax)
        {
            uint v = ((value - oldMin) * (newMax - newMin) / (oldMax - oldMin)) + newMin; // same good.
            return v;
        }
    }
}

-William

Posted in .Net Micro Framework, C#, FEZ, Motors, Servo | Tagged , , , | Comments Off on NETMF Servo classes (PWM and Software versions)

NETMF Joystick Shield Driver

Adding a joystick to your NETMF device is easy with the Sparkfun joystick shield and the following code.

/*
Copyright 2011 William Stacey
Licensed under the Apache License, Version 2.0 (the "License"); you may not use this file except in compliance with the License. You may obtain a copy of the License at
http://www.apache.org/licenses/LICENSE-2.0
Unless required by applicable law or agreed to in writing, software distributed under the License is distributed on an "AS IS" BASIS, WITHOUT WARRANTIES OR CONDITIONS OF ANY KIND, either express or implied. See the License for the specific language governing permissions and limitations under the License. 
*/
using System;
using Microsoft.SPOT;
using GHIElectronics.NETMF.Hardware;
using Microsoft.SPOT.Hardware;
using GHIElectronics.NETMF.FEZ;

namespace RobotJoystickRemote
{
    /// <summary>
    /// Joystick class to control Sparkfun's Joystick Shield kit.
    /// http://www.sparkfun.com/products/9760
    /// This class uses the GHI Button class found here:
    /// http://www.ghielectronics.com/downloads/FEZ/Component/FEZ_Components_Button.cs
    /// </summary>
    public class JoystickShield
    {
        public event FEZ_Components.Button.ButtonPressEventHandler UpClick;
        public event FEZ_Components.Button.ButtonPressEventHandler DownClick;
        public event FEZ_Components.Button.ButtonPressEventHandler LeftClick;
        public event FEZ_Components.Button.ButtonPressEventHandler RightClick;
        public event FEZ_Components.Button.ButtonPressEventHandler JoystickClick;

        AnalogIn xPin;
        AnalogIn yPin;
        FEZ_Components.Button joyClick;
        FEZ_Components.Button up;
        FEZ_Components.Button down;
        FEZ_Components.Button left;
        FEZ_Components.Button right;

        public JoystickShield()
        {
            // Hookup Joystick.
            xPin = new AnalogIn(AnalogIn.Pin.Ain0);
            yPin = new AnalogIn(AnalogIn.Pin.Ain1);
            xPin.SetLinearScale(-100, 101);
            yPin.SetLinearScale(-100, 101);
            joyClick = new FEZ_Components.Button(FEZ_Pin.Interrupt.Di2);
            joyClick.ButtonPressEvent += (FEZ_Pin.Interrupt pin, FEZ_Components.Button.ButtonState state) =>
            {
                var ev = JoystickClick;
                if (ev != null)
                    ev(pin, state);
            };

            // Hookup push buttons.
            up = new FEZ_Components.Button(FEZ_Pin.Interrupt.Di4);
            down = new FEZ_Components.Button(FEZ_Pin.Interrupt.Di5);
            left = new FEZ_Components.Button(FEZ_Pin.Interrupt.Di6);
            right = new FEZ_Components.Button(FEZ_Pin.Interrupt.Di3);
            up.ButtonPressEvent += (FEZ_Pin.Interrupt pin, FEZ_Components.Button.ButtonState state) =>
            {
                var ev = UpClick;
                if (ev != null)
                    ev(pin, state);
            };
            down.ButtonPressEvent += (FEZ_Pin.Interrupt pin, FEZ_Components.Button.ButtonState state) =>
            {
                var ev = DownClick;
                if (ev != null)
                    ev(pin, state);
            };
            left.ButtonPressEvent += (FEZ_Pin.Interrupt pin, FEZ_Components.Button.ButtonState state) =>
            {
                var ev = LeftClick;
                if (ev != null)
                    ev(pin, state);
            };
            right.ButtonPressEvent += (FEZ_Pin.Interrupt pin, FEZ_Components.Button.ButtonState state) =>
            {
                var ev = RightClick;
                if (ev != null)
                    ev(pin, state);
            };
        }

        /// <summary>
        /// Gets joystick X position.
        /// </summary>
        public int X
        {
            get { return xPin.Read(); }
        }

        /// <summary>
        /// Gets joystick Y position.
        /// </summary>
        public int Y
        {
            get { return yPin.Read(); }
        }

        /// <summary>
        /// Sets the X and Y scale of the joystick.
        /// Default scale is -100 minimum to 101 maximum. Max scale is non-inclusive.
        /// </summary>
        public void SetScale(int minX=-100, int maxX=101, int minY=-100, int maxY=101)
        {
            xPin.SetLinearScale(minX, maxX);
            yPin.SetLinearScale(minY, maxY);
        }

        /// <summary>
        /// Gets current X and Y position of joystick.
        /// </summary>
        public JoyPosition Position
        {
            get
            {
                JoyPosition jp = new JoyPosition();
                jp.X = xPin.Read();
                jp.Y = yPin.Read();
                return jp;
            }
        }
    }

    public struct JoyPosition
    {
        public int X;
        public int Y;
        public override string ToString()
        {
            return "X: " + X + " Y: " + Y;
        }
    }
}

Have fun.

Posted in .Net Micro Framework, C#, FEZ, Robotics | Tagged , , , , , | Comments Off on NETMF Joystick Shield Driver

Saleae Logic Review

Received my Saleae Logic today. Smile

I did not think I would ever need one. But had an issue with PWM and controlling a servo from my FEZ board. Something like a logic analyzer is really the only way to drill down and get hard evidence and stop guessing what is happening.  Can save hours of testing.  Anyway, I like bullet points, so here are the pros and cons.

Pros

  • Nice looking hardware. Compact and elegant design.
  • Nice software. It takes a lot of work to make a really good simple abstraction.  And it shows.
  • Capture and timing accuracy seems right on as one would hope.
  • The micro-hook probes seem are nice quality.  The wires connectors are a bit hard to press into the hooks.
  • Nice case to store everything in.

Cons:

  • Software crashed a few times first couple times I used it. No message, just closed.  Once doing an Export and once after setting another trigger on a different line. The 1.5 Beta seemed to solve those issues.
  • Limited documentation.  Not even a quick start on how to hook it up.  If this is your first analyzer, it is not obvious how to get started.  The wire connector is not keyed, so you can incorrectly connect it (which Spark Fun says could damage it).  Also, Black wire is normally ground, but not on this harness.  Grey is ground and Black is pin 1. Very strange choice considering we have black (or even green) burnt into our brains as GND.  I could guess that you need to hook ground wire to a ground on your circuit and one test wire to what you are testing – but it would be helpful to at least supply a one page document in the product to verify your assumptions instead of hoping your right.
  • They do have some limited documentation for the software online, but it is pretty thin.  For such a well thought out device, the lack of good docs seem odd.
  • Some choices on UX not in my taste.  For example, it would seem natural to click on square wave thinking you will get the details of the wave on the right and to make those details “sticky”.  Instead, clicking on anything on the wave zooms down.  There is no way to make wave details “stick” on right if you want to screen capture the details of that period.

Despite some of the minor cons, this is a great little integrated device and worth the $149.  If you don’t already have one, I would put on your wish list.

Posted in .Net Micro Framework, FEZ, Testing | Tagged , , , | Comments Off on Saleae Logic Review

Simple servo control from FEZ

If you just need the easiest possible way to hook up a servo to FEZ, it does not get easier then this.  No breadboards, mosfets, or resistors.  Just hook the servo wires into the fez and control.  If your servo has a normal 3 pin female connector, then just get some male-to-male jumper wires and your done.  Use a PWM pin to control the servo’s signal wire.  The 5v on the FEZ should be enough for small to medium servos.  If you need more, then power from external supply.

const uint PERIOD = 20 * 1000 * 1000; // 20ms is 20000000ms(nanoseconds)
const uint LowUs = 690;   // min range of servo as microseconds.
const uint HighUs = 2422; // max range of servo as microseconds.

/// <summary>
/// Set servo position.
/// </summary>
/// <remarks>
/// The standard range for 180degree servos is 1 to 2 milliseconds high in a 20ms period, with
/// neutral in the middle at 1.5ms. Exact range varies between servos. Find exact range with
/// a servo tester or PWM range testing.
/// </remarks>
/// <param name="servo">PWM pin of servo control.</param>
/// <param name="highUs">High time in microseconds (e.g. 1500us is 1.5ms or neutral)</param>
public static void SetSimpleServo(PWM servo, uint highUs)
{
    Debug.Print("Set servo nanoseconds: " + highUs);
    servo.SetPulse(PERIOD, highUs * 1000);
}

public static void SetSimpleServoByDegree(PWM servo, byte degree, bool invert)
{
    if (degree < 0 || degree > 180)
        throw new ArgumentOutOfRangeException("angleDegree");

    if (invert)
        degree = (byte)(180 - degree);
            
    // Scale degree (0-180) to servo position. Mult 1K to get to nanoseconds.
    uint pos = ScaleRange((uint)degree, 0, 180, LowUs, HighUs) * 1000;
    servo.SetPulse(PERIOD, pos);

    Debug.Print("Degree:" + degree + " Position ms:" + pos / (double)1000000);
}
        
private static uint ScaleRange(uint oldValue, uint oldMin, uint oldMax, uint newMin, uint newMax)
{
    return ((oldValue - oldMin) * (newMax - newMin) / (oldMax - oldMin)) + newMin;
}

-William

Posted in .Net Micro Framework, C#, FEZ, Robotics, Servo | Tagged , , , , | Comments Off on Simple servo control from FEZ